
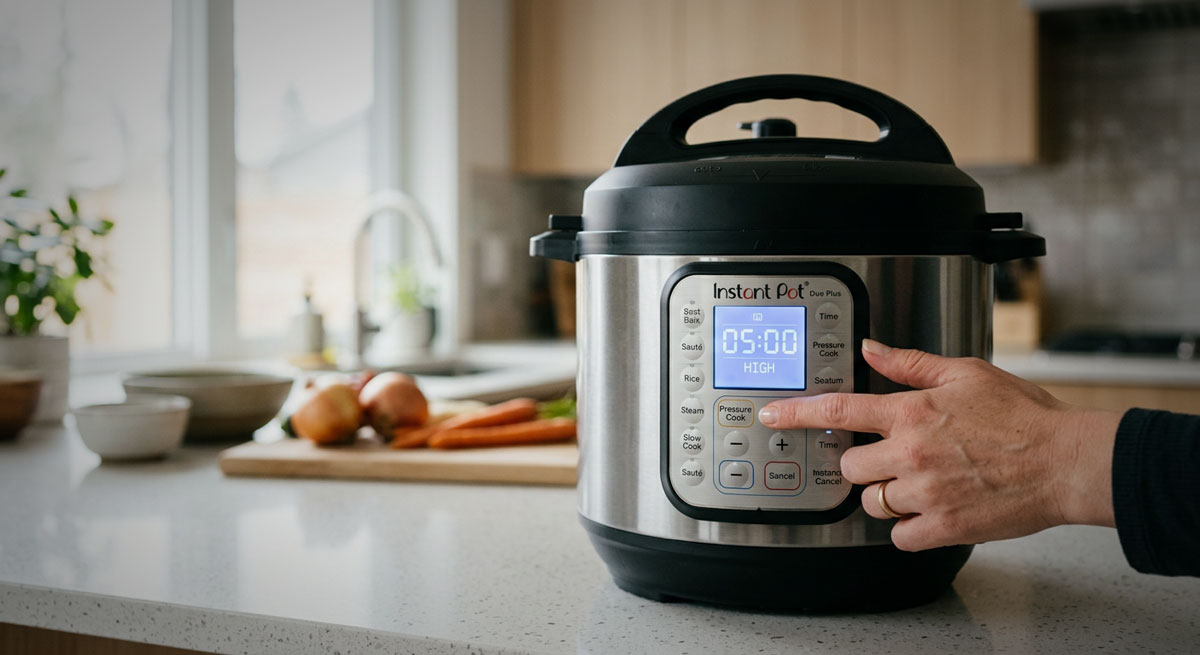
Getting comfortable with your Instant Pot buttons is the first step to stress-free cooking. While the appliance may look intimidating at first, the control panel is actually designed to make cooking easier, not harder. Each button activates a specific cooking program that controls temperature, pressure, and cooking time automatically.
For beginners, the main challenge is simply understanding what each button is meant to do and when to use it. Once you know how the basic functions work, the Instant Pot becomes one of the simplest kitchen appliances you can use. You can cook meals faster, reduce the number of pans you use, and prepare foods that normally take hours in a fraction of the time.
Many people purchase an Instant Pot expecting it to replace several kitchen tools at once. In reality, it acts as a pressure cooker, rice cooker, slow cooker, steamer, sauté pan, and warming device all in one appliance. The buttons on the front simply help automate these functions so you don’t need to manually adjust heat or timing as you would on a stove.
Understanding how these buttons work gives you far more confidence when trying new recipes. Instead of guessing which function to use, you can quickly identify the right program for rice, soups, meats, vegetables, and grains.
In this guide, you’ll learn what the most common Instant Pot buttons do, how to use them correctly, and how they fit into everyday cooking tasks. By the end, you’ll be able to confidently select the right function for rice, soups, meats, vegetables, and more.
What you’ll learn
- The function of each main Instant Pot button
- How to select and use buttons safely
- Which buttons are best for common cooking tasks
- How to avoid common button-related mistakes
Understanding these basics will help you get reliable results and avoid frustration when you’re first learning to cook with pressure.
Step-by-step guide
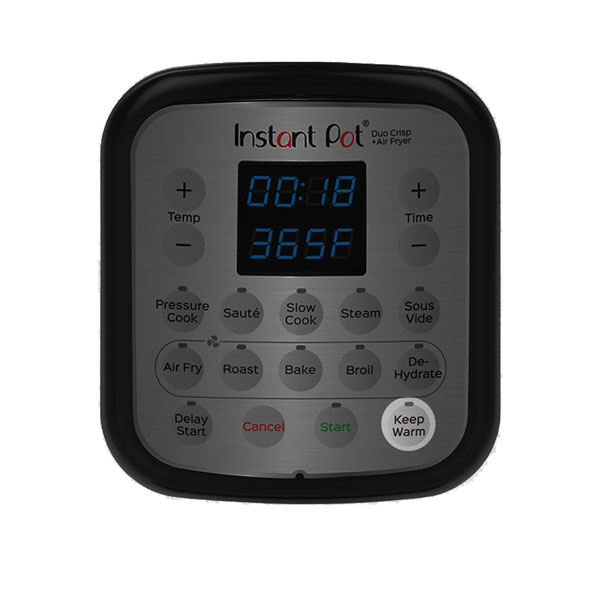
Step 1: Identify the Basic Buttons on Your Instant Pot
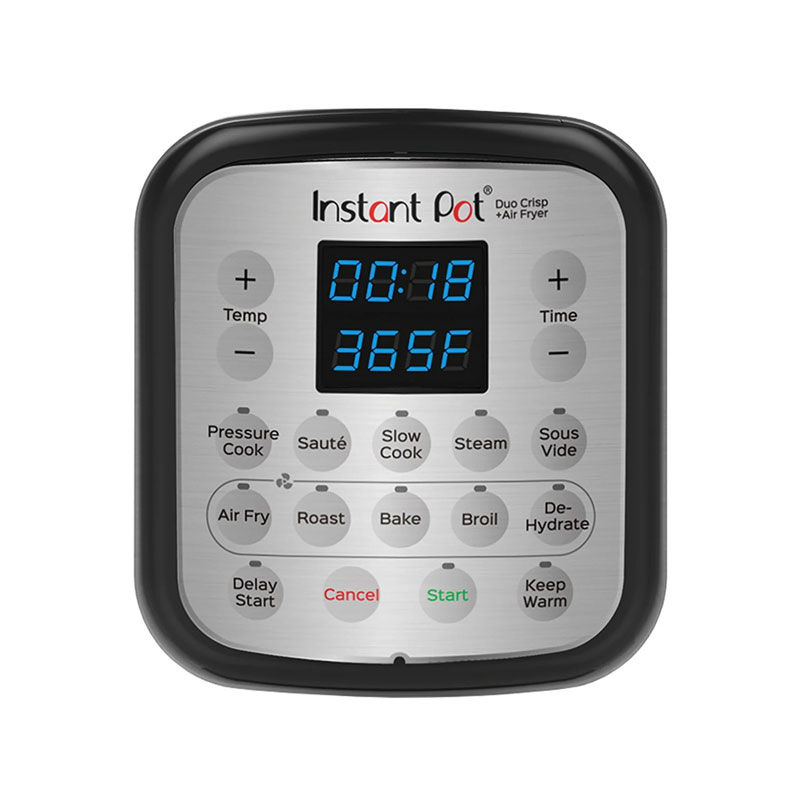
Start by looking at the control panel on your Instant Pot. While the exact layout may vary slightly depending on the model, most units include a core set of cooking buttons. These usually include:
- Pressure Cook (or Manual on older models)
- Saute
- Slow Cook
- Rice
- Multigrain
- Keep Warm
Many models also include additional preset programs such as Soup/Broth, Beans/Chili, Poultry, or Steam. These presets adjust pressure levels and cooking times automatically for certain foods.
However, it’s important to know that most Instant Pot recipes primarily rely on just a few core functions—especially Pressure Cook and Saute. The preset buttons simply provide convenient shortcuts.
For example, the Soup button typically uses high pressure for a moderate cooking time, while the Beans/Chili preset may run a slightly longer cooking cycle. These programs are useful, but they are not required for most recipes.
Spend a moment locating these buttons and familiarizing yourself with the display screen, the plus and minus time controls, and the start button if your model has one. Understanding how to navigate the control panel will make every recipe easier to follow.
Expected result: You should recognize what each button on your model does and where they are located on the control panel.
Step 2: Learn What the Pressure Cook Button Does
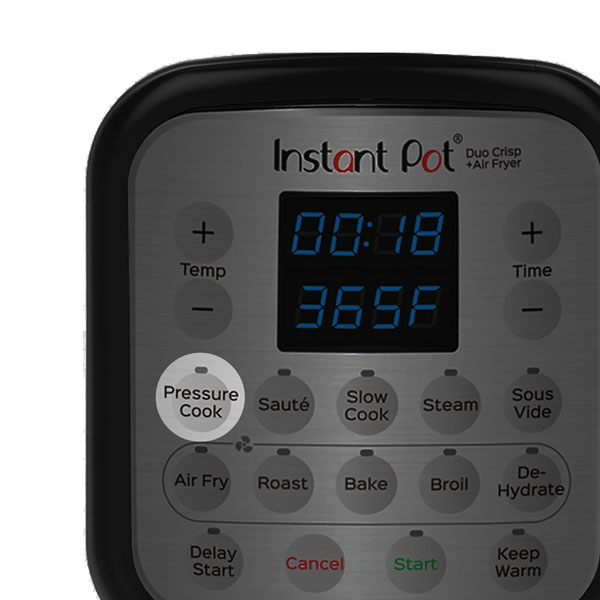
The Pressure Cook button is the most important function on your Instant Pot. This is the setting that allows the appliance to cook food using sealed steam pressure.
Inside the pot, liquid heats until it produces steam. Because the lid locks and seals the pressure inside, the boiling point of water rises. This allows food to cook much faster than traditional boiling or simmering.
Here are some common foods cooked with the Pressure Cook button:
- Dry beans
- Chicken and beef
- Soups and stews
- Pot roast
- Pasta dishes
- Hard-boiled eggs
When you press the Pressure Cook button, you can adjust the cooking time using the + and – buttons. Most Instant Pot models also allow you to switch between High Pressure and Low Pressure depending on the recipe.
High pressure is used for most cooking tasks because it reduces cooking time significantly. Low pressure is sometimes used for delicate foods like fish, vegetables, or custards that might overcook at higher pressure levels.
One important detail is that the Instant Pot takes time to build pressure before the timer starts. Depending on the amount of food and liquid inside, this can take anywhere from 5 to 15 minutes. This preheating phase is normal and should always be considered when planning meal timing.
Expected result: You will know that the Pressure Cook button is used for fast cooking with steam pressure and is the most commonly used function on the appliance.
Safety note: Always ensure the lid is locked before pressure cooking and the steam release valve is set correctly.
Step 3: Use the Saute Button for Browning and Searing
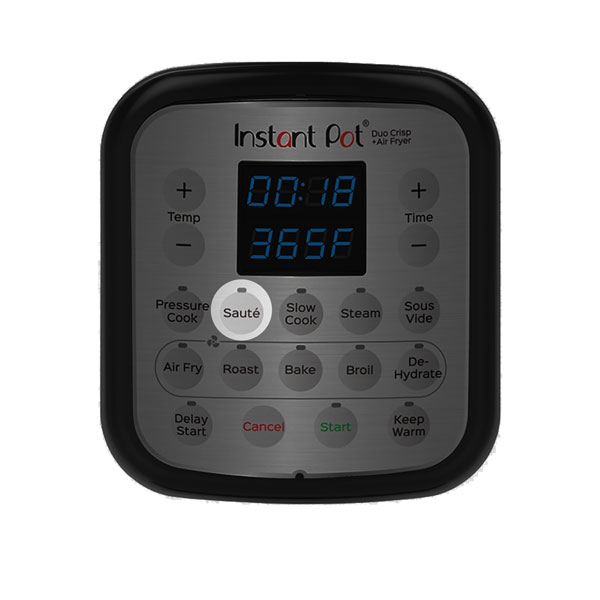
The Saute button turns the Instant Pot into a heated cooking pot similar to a stovetop pan. This mode heats the inner pot directly without building pressure.
This function is extremely useful because it allows you to prepare ingredients in the same pot before pressure cooking. Instead of using a separate skillet, you can brown ingredients right inside the Instant Pot.
Common uses for the Saute function include:
- Browning onions and garlic
- Searing meat before pressure cooking
- Reducing sauces
- Cooking aromatics for soups and stews
- Thickening gravies after pressure cooking
Using the Saute button before pressure cooking can significantly improve the flavor of many dishes. Browning meat or sauteing vegetables helps develop deeper flavors that carry through the entire recipe.
Another advantage of this function is convenience. Because everything happens in the same pot, cleanup becomes much easier. You don’t need extra pans, and the flavorful browned bits left in the pot can be deglazed with broth or water to enhance sauces.
Some Instant Pot models allow you to adjust the heat level for Saute, such as Low, Normal, or High. For most cooking tasks, the Normal setting works well, while High can be used for quick searing.
Expected result: You can prepare ingredients directly in the pot without needing another pan, which simplifies cooking and cleanup.
Safety note: Use a wooden or heat-safe spoon to stir and avoid touching the hot inner pot edges.
Step 4: Explore the Rice and Multigrain Buttons

The Rice and Multigrain buttons are preset programs designed specifically for cooking grains.
The Rice button is typically optimized for white rice. It automatically adjusts pressure and cooking time to produce fluffy rice without requiring much input from the user.
To cook white rice in the Instant Pot:
- Add rinsed rice and water to the inner pot
- Close and seal the lid
- Press the Rice button
The Instant Pot will determine the correct cooking time based on internal sensors.
The Multigrain button is designed for grains that require longer cooking times. This includes foods such as:
- Brown rice
- Quinoa
- Farro
- Barley
- Mixed grain blends
These grains often need higher pressure and longer cooking cycles, which the Multigrain program provides automatically.
While these buttons are convenient, many experienced Instant Pot users still prefer using the Pressure Cook button with manual timing for maximum control. This allows you to adjust cooking times based on personal preference or specific recipes.
Expected result: You will be able to cook rice and grains reliably without guessing cooking times.
Step 5: Use the Keep Warm Button to Maintain Temperature
The Keep Warm button helps maintain the temperature of your food after cooking is complete.
Many Instant Pot models automatically switch to Keep Warm mode when a cooking program finishes. This feature keeps food at a safe serving temperature without overcooking it.
This is especially helpful if:
- Dinner is ready before everyone sits down to eat
- You’re preparing food ahead of time
- You’re serving a buffet-style meal
The Keep Warm function uses gentle heat to maintain temperature, but it does not continue pressure cooking.
For example, if you cook soup or chili in advance, the Instant Pot can keep it warm for an extended period without drying it out. This is ideal for gatherings, meal prepping, or family dinners where timing may vary.
If you prefer not to use this feature, you can usually turn it off before starting the cooking cycle.
Expected result: Your meals stay warm and ready to serve even if you’re not eating immediately.
Common beginner mistakes
When learning to use an Instant Pot, many beginners run into small problems that are easy to avoid once you understand how the appliance works.
One common mistake is forgetting to check the sealing ring inside the lid. The silicone ring is responsible for creating the airtight seal required for pressure cooking. If it is not seated correctly, the pot may fail to build pressure.
Another frequent issue is incorrect steam valve positioning. The valve must be set to the sealing position before pressure cooking begins. If it remains in the venting position, steam will escape and the pot will not pressurize.
Some beginners also accidentally press the timer before adding ingredients, which can start the cooking cycle prematurely. Always make sure food and liquid are inside the pot before selecting a program.
It is also common for new users to override preset cooking times unnecessarily. The Instant Pot presets are designed to work for most situations. If you’re following a recipe, it’s usually best to use the recommended time rather than guessing.
Finally, avoid leaving the lid locked during Saute or Slow Cook mode. These functions do not require pressure and should be used with the lid open or loosely placed on top.
By paying attention to these small details, you can avoid most beginner frustrations and enjoy reliable results every time you cook.
Helpful accessories
| Image | Product | Why it helps | View on Amazon |
|---|---|---|---|
 |
Silicone Instant Pot Lid Cover | Keeps your Instant Pot clean and prevents splatters when using Saute or Keep Warm modes. | Buy Now! |
 |
Instant Pot Inner Pot Holder | Makes removing the hot inner pot safe and easy, protecting your hands and counters. | Buy Now! |
 |
Stainless Steel Steamer Basket | Allows you to steam vegetables and fish easily inside your Instant Pot. | Buy Now! |
 |
Heat Resistant Silicone Mitts | Protects your hands when handling hot pots or lids during and after pressure cooking. | Buy Now! |
 |
Magnetic Instant Pot Cheat Sheet | Keeps quick button and cooking time references on your fridge for fast, confident use. | Buy Now! |
Related guides
Start here: Instant Pot Beginner Guide
FAQ
What does the Pressure Cook button do?
The Pressure Cook button starts cooking food quickly using high-pressure steam, which reduces cooking time compared to traditional methods.
Can I use the Saute button before pressure cooking?
Yes, the Saute button lets you brown or saute ingredients directly in the pot before pressure cooking, enhancing flavor and texture.
Is it safe to open the Instant Pot lid immediately after cooking?
No, you should release pressure fully—either naturally or using the quick-release valve—before opening the lid to avoid burns.
What is the Keep Warm button for?
Keep Warm maintains the temperature of your food after cooking completes, so your meal stays hot until you’re ready to serve.
Can I cook rice using the Instant Pot buttons?
Yes, the Rice button is set for perfectly cooking white rice, and the Multigrain button works well for brown rice and similar grains.